Google Cloud Nightscout » Virtual Machine
In this guide, we will create a free virtual machine in your Google project. Each Google account is eligible for one free virtual machine.
For additional assistance, a video clip on this page may be helpful. This process takes about 2 minutes.
This virtual machine is strictly for hosting Nightscout. Do not use it for work, banking, trading, shopping, or development.
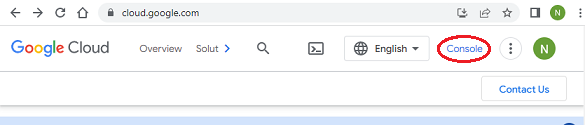
After signing into Google Cloud, click “Console”.
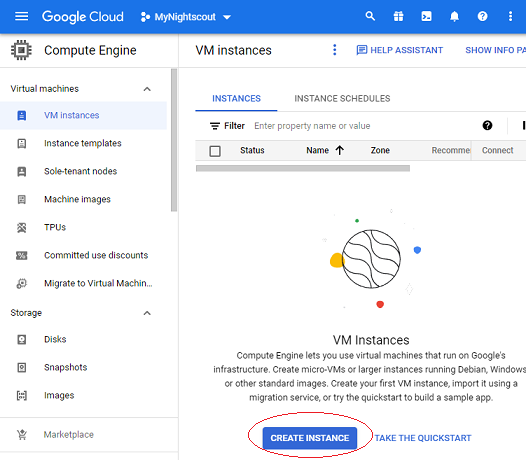
From the menu, select “Compute Engine > VM instances”.
If you already have a virtual machine and proceed to create another, it will not be free.
If you are considering deleting your existing virtual machine, see this section for guidance.
Click the Cloud Shell button at the top right corner of the page.

Authorize when prompted.
The Cloud Shell window will open at the bottom.
Copy and paste the following highlighted line into the Cloud Shell you opened, then press Enter.
You will be asked to enter a name for the new virtual machine. You can simply press Enter to accept the suggested name, or type your own.
Confirm the creation of the machine.
Your virtual machine will then be created.
If you experience any problems, you can follow the original manual instructions further down this page instead.
However, please report any issues by opening a discussion here.
The following are the original step-by-step instructions for creating the virtual machine manually from the Google Cloud menus, if you prefer not to use the Cloud Shell method.
Go to “Compute Engine” → “VM Instances”.
Select “Create Instance”.
Select all the items mentioned below. Leave everything else as is.
Select a region that qualifies for free tier. Those are  ,
,  or
or  .
.
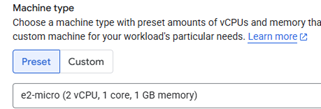
Set machine type to “e2-micro”.
Under “OS and storage”, click on Change and modify as shown below.
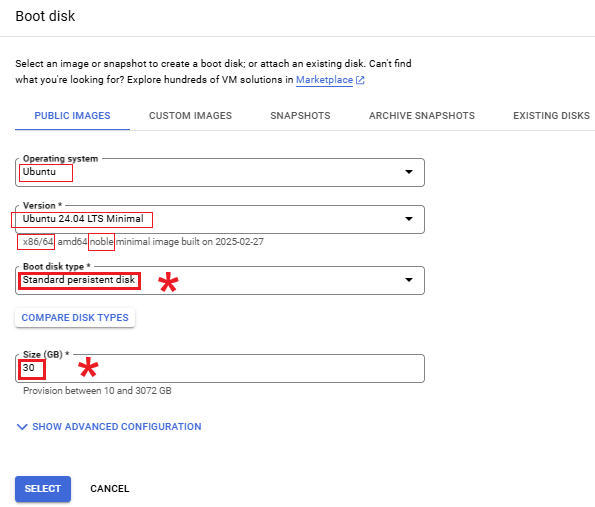
Click on “Select”.
Under Data protection, choose “No backups”.
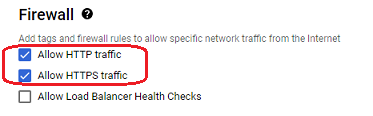
Under “Firewall”, enable both http and https.
Under “Network interfaces”, click on “default”. In the fields that appear, under “Network Service Tier”, select “Standard”.
Click on “Done”.
Before clicking on create, ensure the following settings are correct:
| Parameters | Requirements | Why |
|---|---|---|
| Machine Region | Oregon, Iowa or South Carolina | Free Tier |
| Machine Type | e2-micro | Free Tier |
| Disk type | persistent disk | Free Tier |
| Disk size | Less than or equal to 30GB | Free Tier |
| Operating system | Ubuntu | Compatibility |
| Version | 24.04 LTS Minimal x86 /64, amd64 noble … | Nightscout compatibility |
| Data protection | No backups | Free |
| Firewall | Allow HTTP traffic | Nightscout access |
| Firewall | Allow HTTPS traffic | Nightscout access |
| Network Service Tier | Standard | Free |
Click on “Create” to create the virtual machine. Google will now initialize your virtual machine. Wait for it to come up. It could take a minute. When the external IP column appears, you should be good to go. Your virtual machine is now ready! 🎉
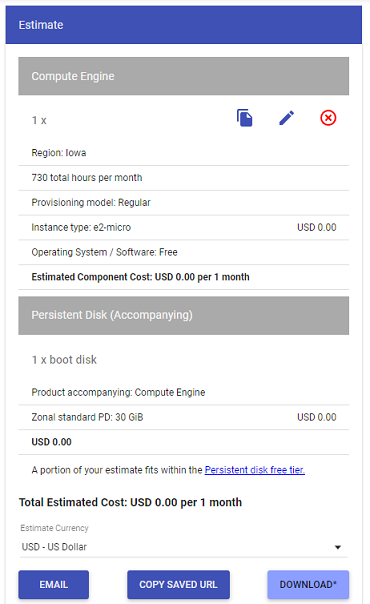
The estimate shown at the top right on the same page will not be 0. As long as you satisfy the conditions listed in the above table, it’s OK. You can ignore that non-0 estimate.
You can also use the calculator to confirm the price.
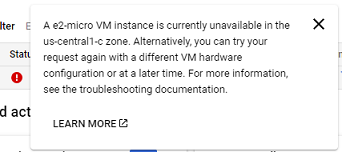
If you see a red exclamation mark after creating your virtual machine and hovering over it shows an error message stating that the instance is unavailable, follow these steps:
1- Dismiss the request by clicking the trash can icon on the right.
2- Reattempt creation in a different region.
3- Unfortunately, you will need to reconfigure all settings from scratch for the new request.